Multiple views
Thus far our graphical interfaces have always included only one view. Next, we'll become familiar with user interfaces containing multiple views.
Generally the views are created as Scene-objects and the transitioning between them happens with events bound to the application. The example below has two Scene objects which both have their own content and an event related to the content. Instead of having an object for laying out components (such as BorderPane) in the example Scene objects, both objects have just one user interface component.
package application;

import javafx.application.Application;
import javafx.scene.Scene;
import javafx.scene.control.Button;
import javafx.stage.Stage;

public class BackAndForthApplication extends Application {

  @Override
  public void start(Stage window) {

      Button back = new Button("Back ..");
      Button forth = new Button(".. forth.");

      Scene first = new Scene(back);
      Scene second = new Scene(forth);

      back.setOnAction((event) -> {
          window.setScene(second);
      });

      forth.setOnAction((event) -> {
          window.setScene(first);
      });

      window.setScene(first);
      window.show();
  }

  public static void main(String[] args) {
      launch(BackAndForthApplication.class);
  }
}
Starting the application above creates a user interface where one can transition from a view to another with the press of a button.
Own layout for each view
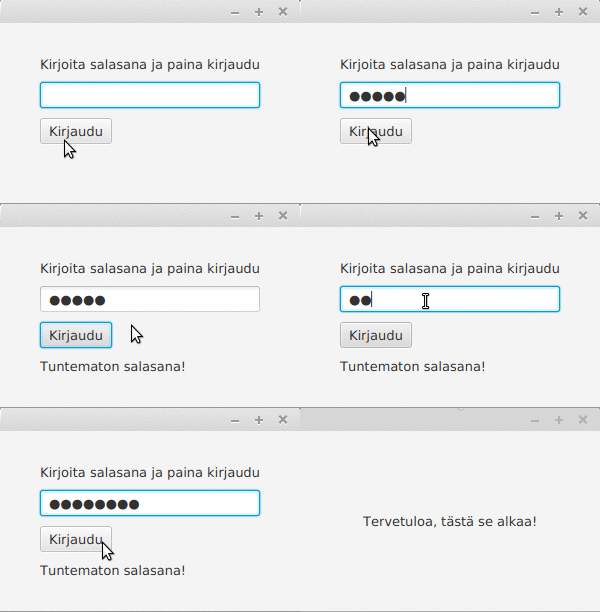
Let's get familiar with an example containing two different views. In the first view user is asked to input a password. If the user types a wrong password, the application informs the user about the mistake. If the user types the correct password, the application switches to the next view. The program functions as follows:

Switching between views happens like in the previous example. The concrete switching event has been bound to the login button. When pressing the button, the application checks the password typed to the password field — here we're hoping that the user writes "password". If the password is correct, the view of the window is changed. In our example the view only includes the text "Welcome, this is the beginning!".
package application;

import javafx.application.Application;
import javafx.geometry.Insets;
import javafx.geometry.Pos;
import javafx.scene.Scene;
import javafx.scene.control.Button;
import javafx.scene.control.Label;
import javafx.scene.control.PasswordField;
import javafx.scene.layout.GridPane;
import javafx.scene.layout.StackPane;
import javafx.stage.Stage;

public class PasswordProtectedApplication extends Application {

  @Override
  public void start(Stage window) throws Exception {

      // 1. Creating the view for asking a password

      // 1.1 Creating components to be used
      Label instructionText = new Label("Write the password and press Log in");
      PasswordField passwordField = new PasswordField();
      Button startButton = new Button("Log in");
      Label errorMessage = new Label("");

      // 1.2 creating layout and adding components to it
      GridPane layout = new GridPane();

      layout.add(instructionText, 0, 0);
      layout.add(passwordField, 0, 1);
      layout.add(startButton, 0, 2);
      layout.add(errorMessage, 0, 3);

      // 1.3 styling the layout
      layout.setPrefSize(300, 180);
      layout.setAlignment(Pos.CENTER);
      layout.setVgap(10);
      layout.setHgap(10);
      layout.setPadding(new Insets(20, 20, 20, 20));

      // 1.4 creating the view itself and setting it to use the layout
      Scene passwordView = new Scene(layout);

      // 2. Creating a view for showing the welcome message
      Label welcomeText = new Label("Welcome, this is the beginning!");

      StackPane welcomeLayout = new StackPane();
      welcomeLayout.setPrefSize(300, 180);
      welcomeLayout.getChildren().add(welcomeText);
      welcomeLayout.setAlignment(Pos.CENTER);

      Scene welcomeView = new Scene(welcomeLayout);

      // 3. Adding an event handler to the login button.
      // The view is changed if the password is right.
      startButton.setOnAction((event) -> {
          if (!passwordField.getText().trim().equals("password")) {
              errorMessage.setText("Unknown password!");
              return;
          }

          window.setScene(welcomeView);
      });

      window.setScene(passwordView);
      window.show();
  }

  public static void main(String[] args) {
      launch(PasswordProtectedApplication.class);
  }
}
The example takes advantage of GridPane's and StackPane's built in setPrefSize and setAlignment methods for layout. Method setPrefSize takes the preferred size of the layout as an argument and the setAlignment method is used to define how the content of the layout should be aligned. The parameter Pos.CENTER is used to place the content in the center of the application
Views with the same main alignment
Sometimes one wants an application to have a permanent view whose parts are swapped when needed. Typically applications that have some kind of menus function in this manner.
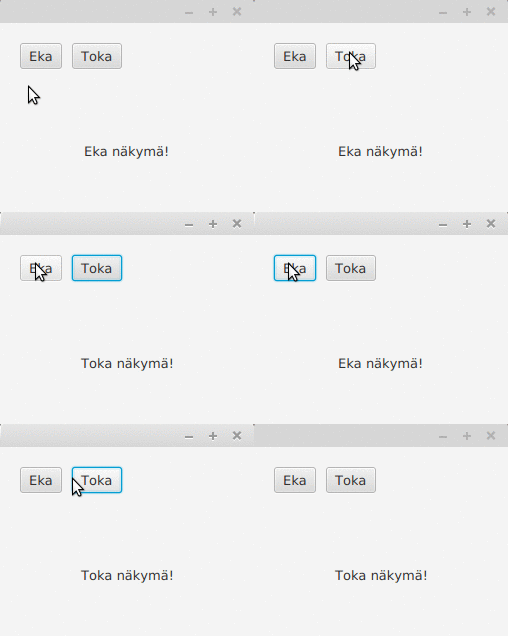
In the example below, there is a application which contains a main menu and an area with variable content. When pressing the buttons on the main menu the the content of the content area changes.
package application;

import javafx.application.Application;
import javafx.geometry.Insets;
import javafx.geometry.Pos;
import javafx.scene.Scene;
import javafx.scene.control.Button;
import javafx.scene.control.Label;
import javafx.scene.layout.BorderPane;
import javafx.scene.layout.HBox;
import javafx.scene.layout.StackPane;
import javafx.stage.Stage;

public class ExampleApplication extends Application {

    @Override
    public void start(Stage window) throws Exception {

        // 1. Create main layout
        BorderPane layout = new BorderPane();

        // 1.1. Create menu for main layout
        HBox menu = new HBox();
        menu.setPadding(new Insets(20, 20, 20, 20));
        menu.setSpacing(10);

        // 1.2. Create buttons for menu
        Button first = new Button("First");
        Button second = new Button("Second");

        // 1.3. Add buttons to menu
        menu.getChildren().addAll(first, second);

        layout.setTop(menu);


        // 2. Add subviews and add them to the menu buttons
        // 2.1. Create subview layout
        StackPane firstLayout = createView("First view");
        StackPane secondLayout = createView("Second view");

        // 2.2. Add subviews to button. Pressing the buttons will change the view
        first.setOnAction((event) -> layout.setCenter(firstLayout));
        second.setOnAction((event) -> layout.setCenter(secondLayout));

        // 2.3. Set initial view
        layout.setCenter(firstLayout);

        // 3. Create main scene with layout
        Scene scene = new Scene(layout);


        // 4. Show the main scene
        window.setScene(scene);
        window.show();
    }

    private StackPane createView(String text) {

        StackPane layout = new StackPane();
        layout.setPrefSize(300, 180);
        layout.getChildren().add(new Label(text));
        layout.setAlignment(Pos.CENTER);

        return layout;
    }

    public static void main(String[] args) {
        launch(ExampleApplication.class);
    }
}
The program functions as follows:

Separating application logic and user interface logic
Keeping the application logic and user interface logic in the same class or in the same classes is usually a bad idea. It makes testing and editing the application considerably more difficult and also makes the source code harder to read. The principle "Each class should have only one clear responsibility" applies well here too.
Let's inspect separating application logic from user interface logic. Let's suppose that we have an object using the following interface and we want to create a user interface for saving applications.
public interface PersonWarehouse {
    void save(Person person);
    Person search(String socialSecurityNumber);

    void delete(Person person);
    void delete(String socialSecurityNumber);
    void deleteAll();

    Collection<Person> getAll();
}
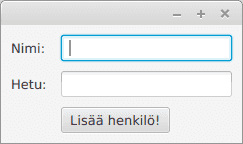
When implementing a user interface a good starting point is drawing the interface followed by adding appropriate user interface components to the user interface. When saving persons to a database we need a field for name, a field for social security number and a button for adding the person. In addition we'll also create
Lets use GridPane class for the layout. There are 3 rows and 2 columns in the user interface. We'll add the event handling later. The initialization method is as follows:
@Override
public void start(Stage window) {

    Label nameText = new Label("Name: ");
    TextField nameField = new TextField();
    Label secText = new Label("Social security number: ");
    TextField secField = new TextField();

    Button addButton = new Button("Add person!");

    GridPane components = new GridPane();
    components.add(nameText, 0, 0);
    components.add(nameField, 1, 0);
    components.add(secText, 0, 1);
    components.add(secField, 1, 1);
    components.add(addButton, 1, 2);

    // Add some style to the ui
    components.setHgap(10);
    components.setVgap(10);
    components.setPadding(new Insets(10, 10, 10, 10));

    Scene scene = new Scene(components);

    window.setScene(scene);
    window.show();
}
Next lets add an object that implements the ActionEvent interface that adds field values to PersonWarehouse interface.
@Override
public void start(Stage window) {
    // ...

    addButton.setOnAction((event) -> {
        warehouse.save(new Person(nameText.getText(), secText.getText());
    });
    // ...
}
But where do we get the actual PersonWarehouse-object? It is created at the beginning of the start method. Below is the code in whole.
import javafx.application.Application;
import javafx.geometry.Insets;
import javafx.scene.Scene;
import javafx.scene.control.Button;
import javafx.scene.control.Label;
import javafx.scene.control.TextField;
import javafx.scene.layout.GridPane;
import javafx.stage.Stage;

public class PersonApp extends Application {

    @Override
    public void start(Stage window) {
        PersonWarehouse warehouse = new MyPersonWarehouse();

        Label nameText = new Label("Name: ");
        TextField nameField = new TextField();
        Label secText = new Label("Social security number: ");
        TextField secField = new TextField();

        Button addButton = new Button("Add person!");

        addButton.setOnAction((event) -> {
            warehouse.save(new Person(nameText.getText(), secText.getText());
        });

        GridPane components = new GridPane();
        components.add(nameText, 0, 0);
        components.add(nameField, 1, 0);
        components.add(secText, 0, 1);
        components.add(secField, 1, 1);
        components.add(addButton, 1, 2);

        // Add some style to the ui
        components.setHgap(10);
        components.setVgap(10);
        components.setPadding(new Insets(10, 10, 10, 10));

        Scene scene = new Scene(components);

        window.setScene(scene);
        window.show();
    }

    public static void main(String[] args) {
        launch(PersonApp.class);
    }
}
A slightly larger application: Vocabulary practice
Let's outline an application that can be used to practise vocabulary of a foreign language. The application offers two features to the user: entering words and their translations, and practising with the stored words. We'll create four different classes for the application: the first class offers the core logic, i.e. maintaining a dictionary; second and third classes contain the entering view and the practice view; and the fourth class contains the main menu and the functionality required to start the application.
Dictionary
The dictionary is going to be implemented with the help of a hash map and a list. The hash map contains the words and their translations, and the list is used to randomly choose the word for practice. The class has the necessary methods for adding a translation, for fetching a translation, and for drawing a random word.
package application;

import java.util.ArrayList;
import java.util.HashMap;
import java.util.List;
import java.util.Map;
import java.util.Random;

public class Dictionary {

    private List<String> words;
    private Map<String, String> translations;

    public Dictionary() {
        this.words = new ArrayList<>();
        this.translations = new HashMap<>();

        add("sana", "word");
    }

    public String get(String word) {
        return this.translations.get(word);
    }

    public void add(String word, String translation) {
        if (!this.translations.containsKey(word)) {
            this.words.add(word);
        }

        this.translations.put(word, translation);
    }

    public String getRandomWord() {
        Random random = new Random();
        return this.words.get(random.nextInt(this.words.size()));
    }
}
You could also implement the Dictionary so that returning a random word would always generate a new list of words from the keys of the translations hash map. In such a case there would be no need to maintaing a separate list of words. However, this would have an effect on the performance of the program (or it would have had an effect before the turn of the millennium — computers these days are a tad faster...).
Entering new words
Next we'll shape the functionality that's needed for entering words. In order for us to do that, we're going to need a reference to the dictionary object, and text fields for the word and its translation. The GridPane layout works well for the fields. Let's create a class called InputView. It contains the method getView that creates the view necessary for entering new words. This method should return a reference to a Parent type object. Parent is a superclass to many classes, among them all the classes used for layouts. Therefore any layout class can be represented as a Parent object.
The class also defines what happens when a button in the user interface is pressed. When the user clicks the button, the new word is added to the dictionary. The text fields are also cleared so that the next word can be entered.
package applicatoin;

import javafx.geometry.Insets;
import javafx.geometry.Pos;
import javafx.scene.Parent;
import javafx.scene.control.Button;
import javafx.scene.control.Label;
import javafx.scene.control.TextField;
import javafx.scene.layout.GridPane;

public class InputView {

    private Dictionary dictionary;

    public InputView(Dictionary dictionary) {
        this.dictionary = dictionary;
    }

    public Parent getView() {
        GridPane layout = new GridPane();

        Label wordInstruction = new Label("Word");
        TextField wordField = new TextField();
        Label translationInstruction = new Label("Translation");
        TextField translationField = new TextField();

        layout.setAlignment(Pos.CENTER);
        layout.setVgap(10);
        layout.setHgap(10);
        layout.setPadding(new Insets(10, 10, 10, 10));

        Button addButton = new Button("Add the word pair");

        layout.add(wordInstruction, 0, 0);
        layout.add(wordField, 0, 1);
        layout.add(translationInstruction, 0, 2);
        layout.add(translationField, 0, 3);
        layout.add(addButton, 0, 4);

        addButton.setOnMouseClicked((event) -> {
            String word = wordField.getText();
            String translation = translationField.getText();

            dictionary.add(word, translation);

            wordField.clear();
            translationField.clear();
        });

        return layout;
    }
}
Vocabulary training
Now we shall create the functionality to practise mastery of the stored words. We are going to need a reference to a dictionary object, so that we have a source for the words used for practice and so that we can check whether the translation is correct. In addition to the dictionary, we are going to need a text component that informs the user of which word to translate, and a text field where the translation can be placed. GridPane works well enough to handle the layout of the fields in this case, too.
The translated word at each time is an object variable of the class. The object variable can be used and changed also in the method that is defined in the context of an event handler.
package application;

import javafx.geometry.Insets;
import javafx.geometry.Pos;
import javafx.scene.Parent;
import javafx.scene.control.Button;
import javafx.scene.control.Label;
import javafx.scene.control.TextField;
import javafx.scene.layout.GridPane;

public class PracticeView {

    private Dictionary dictionary;
    private String word;

    public PracticeView(Dictionary dictionary) {
        this.dictionary = dictionary;
        this.word = dictionary.getRandomWord();
    }

    public Parent getView() {
        GridPane layout = new GridPane();

        Label wordInstruction = new Label("Translate the word '" + this.word + "'");
        TextField translationField = new TextField();

        layout.setAlignment(Pos.CENTER);
        layout.setVgap(10);
        layout.setHgap(10);
        layout.setPadding(new Insets(10, 10, 10, 10));

        Button addButton = new Button("Check");

        Label feedback = new Label("");

        layout.add(wordInstruction, 0, 0);
        layout.add(translationField, 0, 1);
        layout.add(addButton, 0, 2);
        layout.add(feedback, 0, 3);

        addButton.setOnMouseClicked((event) -> {
            String translation = translationField.getText();
            if (dictionary.get(word).equals(translation)) {
                feedback.setText("Correct!");
            } else {
                feedback.setText("Incorrect! The translation fo the word '" + word + "' is '" + dictionary.get(word) + "'.");
                return;
            }

            this.word = this.dictionary.getRandomWord();
            wordInstruction.setText("Translate the word '" + this.word + "'");
            translationField.clear();
        });

        return layout;
    }
}
Practice application
The practice application both unites the previously created classes and offers the main menu of the application. The structure of the practice application is as follows.
package application;

import javafx.application.Application;
import javafx.geometry.Insets;
import javafx.scene.Scene;
import javafx.scene.control.Button;
import javafx.scene.layout.BorderPane;
import javafx.scene.layout.HBox;
import javafx.stage.Stage;

public class PracticeApplication extends Application {

    private Dictionary dictionary;

    @Override
    public void init() throws Exception {
        // 1. Create the dictionary that the application uses
        this.dictionary = new Dictionary();
    }

    @Override
    public void start(Stage stage) throws Exception {
        // 2. Create the views ("subviews")
        PracticeView practiceView = new PracticeView(dictionary);
        InputView inputView = new InputView(dictionary);

        // 3. Create the higher level layout
        BorderPane layout = new BorderPane();

        // 3.1. Create the menu for the general layout
        HBox menu = new HBox();
        menu.setPadding(new Insets(20, 20, 20, 20));
        menu.setSpacing(10);

        // 3.2. Create the menu buttons
        Button enterButton = new Button("Enter new words");
        Button practiceButton = new Button("Practice");

        // 3.3. Add the buttons to the menu
        menu.getChildren().addAll(enterButton, practiceButton);
        layout.setTop(menu);


        // 4. Connect the subviews with the buttons. Clicking menu buttons changes the subview.
        enterButton.setOnAction((event) -> layout.setCenter(inputView.getView()));
        practiceButton.setOnAction((event) -> layout.setCenter(practiceView.getView()));

        // 5. First show the input view
        layout.setCenter(inputView.getView());

        // 6. Create the main view and add the high level layout
        Scene view = new Scene(layout, 400, 300);

        // 7. Show the application
        stage.setScene(view);
        stage.show();
    }

    public static void main(String[] args) {
        launch(PracticeApplication.class);
    }
}Remember to check your points from the ball on the bottom-right corner of the material!